My Girl: Gettin' After It!!

My Girl: Gettin' After It!!
My truck on her maiden voyage in Moab 2012

Sunday, June 29, 2014

And there was no response from the brakes...

All in all it turned out well, but there were some harrowing initial moments when I first pulled out into the cul de sac and the pedal registered absolutely no response from the brakes! Panic. Pumping. Pulling of the e-brake. And then the cylinders engaged appropriately.

This is the tale of my home brake job.

 First off, shout out to AutoAnything for once again delivering my stuff quickly and in time to make good use of this weekend to tackle a job of unknown duration given my varying competency. I ended up going with Powerstop brake kits front and rear. I was a little nervous because the drop down had an option for 4WD 4.0 v6 for the front but no option for the rear excepting the 2WD 4.0 v6. I assumed there might not be that much variation between my 2WD brethren and my truck in the rear axle but that there might be some variation owing to the presence of the drive shafts in the 4WD configuration. It turned out that worry was all for naught.

I got the truck jacked up all around with jack stands on the frame for the front and on the rear axle to support the aft end. I was a bit worried because there was another kit that didn't seem to make a distinction between the sizing of the pads but my kits came with two different sized pads. I thought this made sense as the majority of the stopping power is concentrated at the front of the vehicle, but it created some apprehension all the same. There were also two of the eight pads that had an extra metalic tab that I still don't know what purpose it served, but I do know now that they both occurred, on my vehicle at least on the passenger sides front and rear to the insides of the rotors. On the front passenger pad, the tab is in the lower position, and for the rear passenger pad, the tab is in the upper position. For these reasons, I wanted to have quick access to all four wheel assemblies if I needed to make a quick investigation.
 These wishbones were only on the front assemblies. When I did my first one, I accidentally left it out. D'oh. Went back and put it in.


 I'm not at all certain why I took this picture. I do, however still see a lot of mud even after 3 rinsings. It is making me reconsider my affinity for splashing through big mud. The majority of the job of changing the rotors and pads in this instance was actually focused on cleaning the components and removing the grit and such out of the way. The work itself was straight forward as the numerous people polled had responded to me to indicate.
 The first pad I encountered had this little tab.
 I also polled some folks on the benefits of slotted/drilled/combination rotors as they pertain to our trucks. I am aware of the marketing and the appeal it has for racers. I don't race my truck. I also wondered if those little holes and slots might entrain mud and debris and become a liability. I haven't heard anything to that effect; so, I decided to give them a go. They do a cost a premium over original equipment manufacturer equivalents, but I figured it was worth it considering the cost that would have been paid to a shop to recondition my existing rotors and furnish new pads. It was appearing to be about the same cost if not a bit cheaper to approach installing a performance set myself. I retained the stock rotors as this was the first brake job and they appeared to be in good condition even after having gone over 100,000 miles in the original configuration. The brakes only started to give the wear indication on the return trip from Ivy Branch. I had initially hoped maybe a pebble or some other debris had gotten wedged in somewhere inappropriate.
 But a comparison of the newly installed pads versus this removed pad shows that I didn't have very much material remaining.
 I had just finished the passenger side and moved my setup over to the driver side. The front half gave me all sorts of trouble. The larger caliper bolts were very well seized up. I hit them blaster and they still wouldn't budge. I got a torque wrench for some extra leverage. No budging. I couldn't initially get my electric impact into position as I had the wheels aligned straight forward. I wrestled with it some more with a ratchet before suddenly the wheel hub turned. My Dad had come by to make sure I hadn't killed myself. Then he asked, "Do you think  your gun will fit now?"

It turns out it did, but it still  wouldn't budge. I flashed back to my failed attempt at putting the OME shocks on when the lower shock mount wouldn't budge. I hit it one more time with the PB blaster, and after a 30 second effort with the impact gun, it finally broke free. I was about 30 more seconds from getting the propane torch and heating that mamma jamma up.
 I took the opportunity to PB blaster the remaining three assemblies one more time.
 It definitely helped here.
The rear, by comparison was cake. Whereas I had read that one might need to beat on the rotors to break them free (and beat I did; initially with a rubber mallet before moving onto my 10lb handheld shorty sledge), the rear driver required minimal coaxing and the rear passenger willingly availed itself to my simply grasping the rotor and drawing it near to my bosom. I don't know why I chose to use that imagery. It was easy. I should just say that the rear passenger was easy.

Anyway, it took some time being cautious and deliberate with cleaning the parts and applying the brake grease to the various areas to which it is recommended for application. It came time for the moment of truth and to start the break in period.

I already foreshadowed it, but just know that there was a frantic 5 seconds where I was staring down my neighbor's mailbox and had terrible visions of it crashing through my windshield and being pummeled with junk mail. Fortunately, it did not come to that.

The brake job was not a bad job. The truck stops well. I tested them all the way to my mom's and back. They will get their true test soon enough.

-will

Sunday, June 22, 2014

Ivy Branch ~ Hatfield & McCoy Trail System- Quick blog post


Well these are definitely constrained times. This will, unfortunately be a more abbreviated post (or so I think at the outset). 

I originally did not think I would have any takers to join me down at Ivy Branch, but I was pleasantly mistaken in the weeks leading up to departure. There is a $50 annual registration, the requirement to wear a DOT helmet (even in a full-size), and the trails are a solid 6 hours away from DC. All the same, Potter was up to the task. I was interested in checking it out as they are the only trails in the Hatfield & McCoy system in West Virginia which are open to full-size jeeps and trucks. I'm also doing fairly well in terms of doing some offroading in multiple states. Thus far represented: Utah, Pennsylvania, Virginia, Tennessee, Massachusetts, New York, and now West Virginia.


 Based on our anticipated arrival and the rain showers which began during the drive, I was able to convince Potter that the Walmart super center contingency is a viable option. Setting up the trucks for the evening rest.
 The next day, we set out for the trail head. You pretty much take 119 from Charleston (past the supercenter where we stopped) and continue to Julian Rd (route 3). It seems like you're on there for longer than it appears on a map, but the trail head pops up just as you're doubting yourself on the right hand side.

 They have operations vehicles. Pretty legit.

 This was my first testing of the Go Pro system. I spent a part of the morning Friday downloading the software upgrade needed for the Hero 3 (I didn't spring for the Hero 3+) to enable it to talk to my iphone. It actually worked splendidly.
 A Titan rolled through with a dirt bike in the back. Although he wasn't wheeling, I snapped the pic for a little Nissan love.
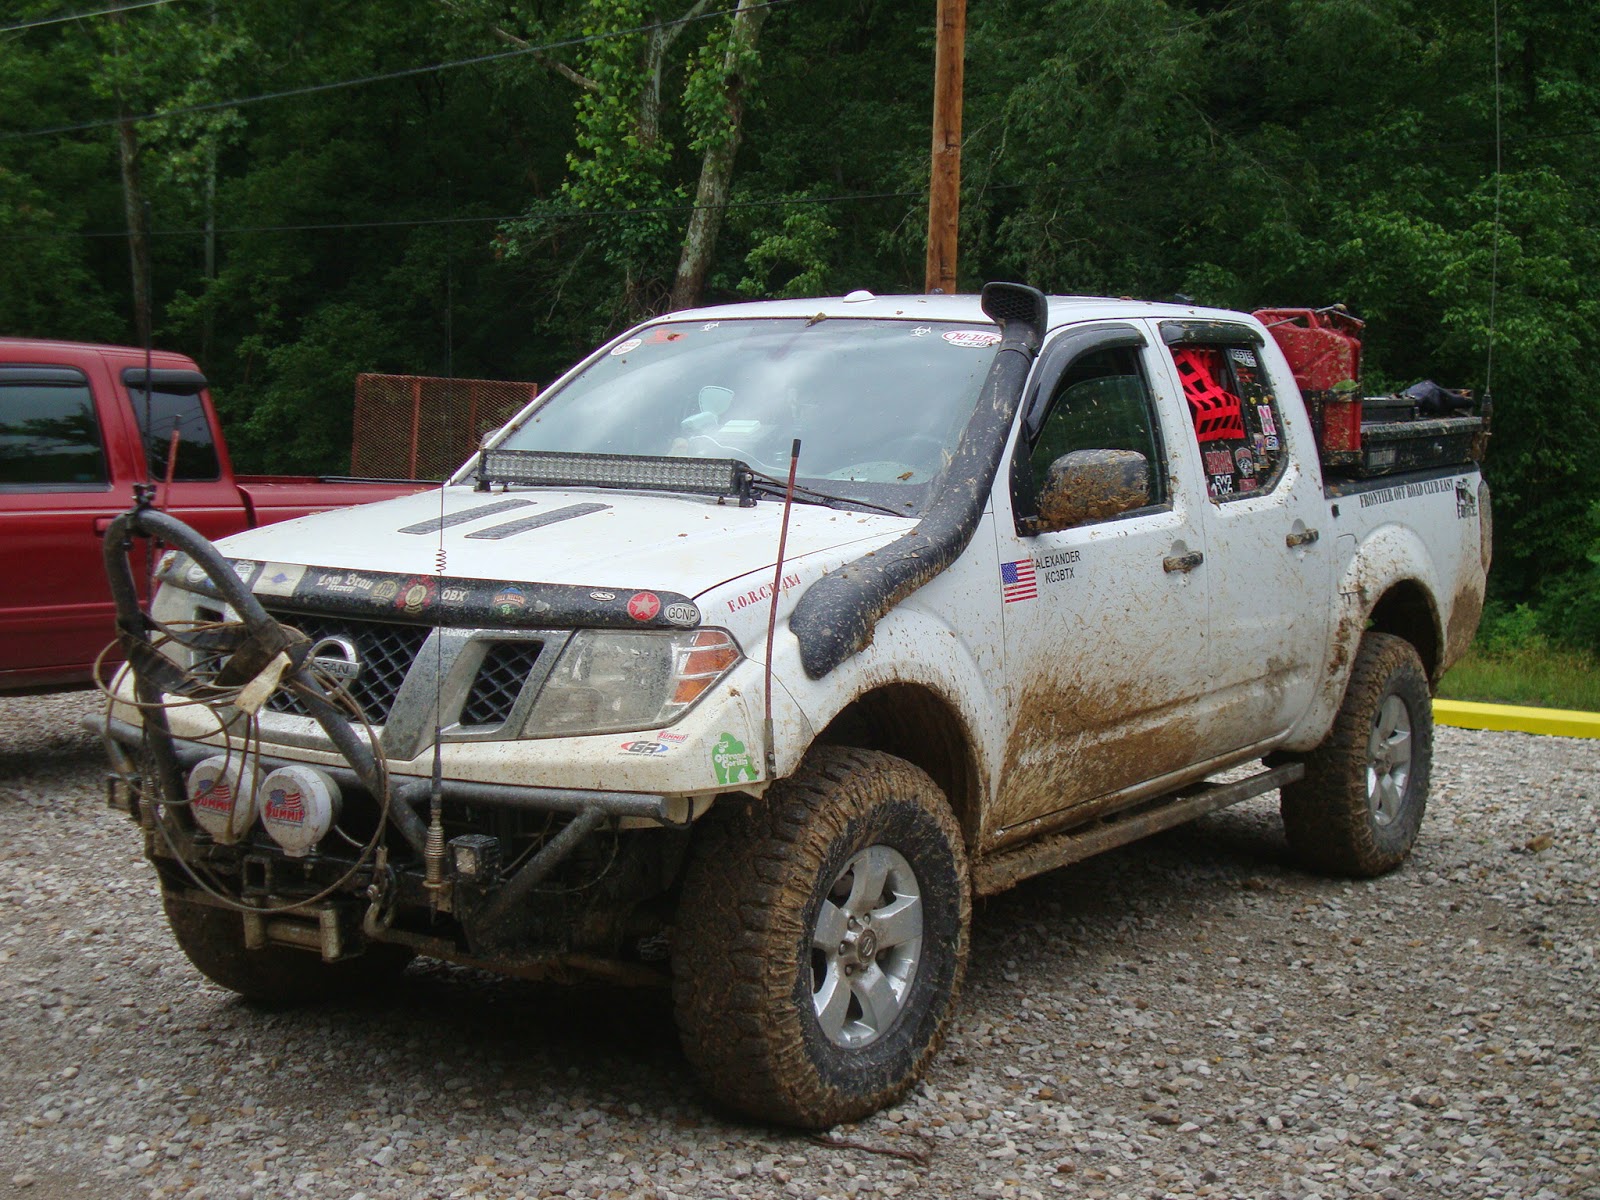
 Conditions on the trails were pretty muddy/soupy. The greens here are very tame. Even in the muddy weather, one would have no problem running them in 2WD. The abundance of mud in the pic above was taken immediately after our first venture onto a blue trail, 41. Under dryer conditions, the blues here are comparable to greens elsewhere. However, that first extended climb up the muddy slalom along the switchbacks with precipitous drops off the side was a bit disconcerting. I was starting to regret having brought Potter up to the blue on his first outing. I made the mistake initially of coming to a stop after not being able to raise Potter on the handheld I had loaned him. When he caught up at the first flat, I didn't have enough grip to gain any momentum to continue. What ensued was a pretty tense 10 minutes of fighting and fishtailing myself the rest of the way up until the tires found some grip and we were able to power up. Potter learned from my mistake and made short work following me up the rest of the way. From there on out we were good. I was just going to open it up, and from either my announcement to do the same or his hearing of my engine revving, he knew similar measures would be needed on his part to continue along.

 The trails were VERY well marked. It was probably the most extensive mapping and trail marking effort I have encountered to date. We did not venture down any trails qualified as black which require roll cages. Although a full-size, in a sense, has a passenger compartment that would afford some limited protection (over what an ATV has), we decided to play it straight. There was one exception which i thought was not a part of any trail, just a steep rocky climb and a steep dirt descent. Those turned out to be Orange-AND-Blacks, which are the most difficult that the trail system has to offer. I wasn't able to climb the rocky outcropping, but I did climb the adjacent dirt slope. I then descended down the rocky outcropping. Pucker Factor was at an 11. My battery  had konked out by this point. I bought what I thought was a second battery; however, it turned out to be a battery for like the first ever Go Pro Hero. I was pissed that it was there still on sale. I didn't discover the error until Friday morning. I'll have to hit up Potter for the video he took of the ascent attempts and then the descent. I was certain the rocks would offer more traction than the steep, looser dirt climb. But I was unwilling to really 'bump it' on the rocks. The truck kept sliding over to driver and I was worried about continuing the momentum into an uncontrolled roll with more throttle. I've seen quite a few 'fail' videos begin in such a manner.
 We made our way back to the trailhead for lunch after having completed pretty much all of the greens and a good chunk of the blue portions.

 For the second portion of the day, we set out to begin with blues such as 54 and 55 which we had bypassed off of 10 upon first entering the trail system.
 It's not really visible regrettably, but I posed our trucks here at a small, cascading water fall.

 Closer photo.
 A few pics from the trail, the latter half.
 I spent more of the day practicing the video command on the GoPro and realized I wouldn't have much for the blog if I didn't start snapping some shots.

 We encountered more of the small rock gardens on the second half on portions like 48, 50, and the like.

 Down to the left in that river bed is another one of the trails. It is a gnarly slalom of smart-car sized rocks and trees rooted in the very center of the stream.
 Posed our trucks after a fun day of wheeling.
 The trucks at our campsite

 Little Coal River Campground.
 Once we set up camp, we actually sought out a car wash with manual stations to try to get some of the mud off while it was still moist. I think this place is called Mountaineer Car Wash. It is a block away from the Hooters where we stopped for dinner in Charleston. If  you wheel here, head to Hooters and stop to wash your truck along the way.

 Our camp site this morning as we were packing up to head home.
 Manual photos by hand of the trip back.

That's about it. There's more to tell, but I immediately came home to a honey-do list and now it is past time for bed. I'm not at all ready for work tomorrow or class, but the truck did pretty well.

I may stay out of the water for a while. Had another dunking that I scarcely got back out of. And the check engine seems to come on after each outing that we go swimming. On the way back, the truck didn't want to take any gas without a fight. I'm thinking that little vapor canister thing is probably all saturated and caked with mud. Probably a good reason to stop swimming and maybe invest in that on-board welder I've been wanting. I've held off because I didn't want to drown the modified alternator, but maybe if we stop playing Aqua-man, I can go ahead and pull the trigger. We'll see. There were a couple other sights and happenings that maybe I'll get to in a subsequent post.

Sunday, June 15, 2014

I went pro.

Steve S. had already warned me that pretty soon he would have to take a bit of a break from the runs. Now, my thought is he could previously justify his Go Pro from having been pretty heavy into the street bike scene and now getting additional usage out on the trails. This pretty much is my only scene...and for a while I felt content doing my shaky hand cam work with the digital. However, with these  upcoming rides to Ivy Branch, Drummond Island, Morningwood and Gulches, the likelihood of me returning in the near term is pretty unlikely. So I decided I wanted to invest in capturing the best footage I could during these initial visits in the event I do not get a chance to schedule a follow-up.

The other factor is the position of trail leading. If I were merely a participant in a convoy, I can jump out at my leisure and set up a quick shot while somebody is figuring out a line or is taking extra time getting spotted. While leading, any down time is spent either studying the map, spotting others, or quickly progressing through tricky spots to make space for subsequent drivers following suit. I therefore really would like the option of already having a camera mounted/affixed to the vehicle and being able to send commands to it remotely to snap pictures or stop/start recording. So I bit the bullet and decided to go pro. Also, if I ever want to attract the attention of real explorers and expedition folks, I suppose I need to show some better investment in gear to chronicle these travels.

No longer a novice. 
I tried covering up the price in the photo, but the Mrs. already came in and saw how much it cost. Error on my part. I think the fact that Steve already  had one helped my cause. "Is this the thing Steve has?"
"Yes, dear," I venture timidly.
"Oh, ok"

Disaster averted.
 My registration came in late last week. They really are insistent on me wearing a helmet inside of my truck. I thought I'd be cool and place this on my windshield, but the instructions on the back clearly indicate where it is to be placed on one's helmet.

 My other decals came in as well. I normally wait  until I have at least arrived at a given park before affixing them to the truck, but I was anxious. The Drummond decal is here too, but there was a part of someone's check visible in the background of the other photo, and with what I'm learning in my Transnational Security class, there is probably some scammer perusing for clues to rip folks off. I blocked you, scammer.

I probably will not have time to work up the in-cab controls before the trip; there are some husbandly duties I did not get to this week between the observation of holidays and some welcome backs and send offs that were going on this weekend. I think it just means, 'Don't get stuck' is the order of the day. Or William P. might have to give me a hand on his maiden voyage with his truck offroad. We'll see.

Sunday, June 8, 2014

Marching towards 7,000 visits

The count said 6,471 this evening. There are some sites that log that many visits every few hours. It has taken me as many years :)

That's ok though.

I didn't get to highlight the work to get the gas cans mounted prior to the AOAA run. It involved cutting and rewelding portions of the headache rack. There were also a few "lessons learned" from the AOAA trip that I wanted to chronicle here. My hope is to get a few of them resolved before the next smaller run down to Ivy Branch, which is a network of trails that has been linked into the broader family of trails comprising the Hatfield & McCoy Trail system in West Virginia.

Here are some photos.
 This hoop section was interfering with the proposed placement of the cans. I wanted to retain some semblance of the hoop to protect the rear cab glass, but I also needed to get the gas cans up and out of the bed. In the proposed location, they are more readily accessible from the ground/outside of the truck. I was also looking to reclaim some bed space. One can was already taking up a good chunk of space. Two cans even more so. I've not yet needed to refuel on any trail ride. I do, however, desire to have the added capacity for when we are traveling on back roads for extended periods without finding an open or available gas station.
 Once the hoop was cut out. I was able to mock up where the cans would ride and how accessible they may be.
 In order to keep them from protruding too far into the bed (past the plane made by the edge of the side rail box), it was necessary for the can to extend a bit out from behind the cab. This does not help for aerodynamics, but neither has just about anything else I've done to the truck thus far. I actually kind of like being able to see the cans a bit from the front.
 At the time that I was working on all of this, I still had the in-bed toolbox removed. On the morning that I was to leave for AOAA, I bit the bullet and actually reinstalled it. I had contemplated orienting it lengthwise, parallel to the side rail box on the passenger side. That approach would have blocked the fire extinguisher or necessitated its relocation. I had clearly waited too late to try to noodle through that and just had to make due. The good thing, though, was that the exercise of trying to do away with it entirely had freed up a lot of the space inside of the box to accommodate my camping gear.


 I was worried about running out of welding wire. (I didn't even approach that possibility as it turned out). I tried to go to my local Home Depot and was very disappointed that, in general, they carry no welding supplies whatsoever. It isn't even that they ran out; they just no longer make it a point to keep anything related to welding in stock. So I had to go a bit further down the road to a Lowe's. I really like HD, the branding, the Olympic athlete support, and several of their other initiatives. But they are starting to kill me with some of these miscues. They won me back a bit after I kept lamenting their decision to not carry any metric nuts and bolts. The one near me now does. It had nothing to do with my pissing and moaning specifically. But I nonetheless felt like they were responding to the vibe that I was putting out into the universe. I'm pretty sure I bought my welder from them online. It would just be good if i could stop into their local establishments to resupply. Anyway, outside of the Lowe's I parked next to this Tacoma. Tacoma's these days stand eye-to-eye with my truck even after all of my efforts to lift Veronica. I was more familiar with the stance of the older models like this one. Not that it would make me change my mind. But it is rare that I stand this tall over a Tacoma. I catch quite a few low riding Rangers and Colorado's though.
 Some rain got to the initial welds before I had a chance to finish them off. A little bit of surface rust. On the passenger side, I had hoped that the angles might line up with the pre-drilled holes at the bottom of the cans. 2 of the 4 did line up, but I ended up needing to weld on this scrap piece of plate to catch all 4 holes. Fortunately, this scrap was appreciably smaller and therefore lighter than the one I mocked up on the driver side.
 Cutting with the band saw, I actually got these pieces to mate up pretty well. And it got ride of that stupid chunk of extra metal from where the antenna mount was relocated.
 Tack welded just to hold the assembly in place momentarily.
 And ouila! Doesn't look half bad. I didn't even bother to grind the welds. I just painted after this picture was taken and called it a day. I can always grind later if I so choose. The unfortunate thing is, despite my efforts to try to shield the rear window, occasional weld splatter and grinding showers has still pitted the rear film in a few area. The big spots are from when a dude kicked mud back there like two trips ago and I still haven't gotten it fully cleared off. I'm pretty sure that was from Mettowee. That Mettowee mud is clinging pretty strong.

We've seen this image before. Stuck in the muck at AOAA.

So I reposted this image to raise the conversation on winching again. I had, once upon a time, ordered a kit which was to be the wireless winch controller from AutoAnything. Unfortunately it was not the full kit, and Westin T-max wanted like another $200 bucks for the full setup. At which point, that was the price tag for another one of their winches (considering I was already $115 in for the components as sent). Fast forward a bit and I ordered a new Superwinch Tigershark to coincide with the fabrication of a new winch bumper and the shifting of the T-max to the rear. At that point, I had toyed around with the idea of perhaps hardwiring them to in-cab controllers. With the passage of time, my line-selection skills had improved and I wasn't winching quite as much. In fact, I was more often recovering others than myself. I did notice, up at Mettowee, that my connectors for even the new front winch could be temperamental at times. For instance, I could spool out, but I was not initially able to reel in when I first got stuck in the snow bank. It seems that, with use, and with changes in temperature, the metal connector pieces that mate up within the sockets sometimes deflect and do not return to their original shape. And overtime, at least for me, this has lead to a bit more sporadic electrical contact. I would like to still retain the external connections for operations where I need to be outside of the vehicle. It would also be helpful for re-spooling the cable to be able to stand in front of the winch and make sure that the line is stacking evenly on the drum. However, for self-recovery, it would be good to be well within the confines of the truck to be shielded from any potential recoil or severing of the line. 

I am going to attempt to get that worked out before my next run. I also may go ahead and order something to weigh down the line while winching. In the fall and winter months, I've thrown a heavy jacket. In the middle of our muddy, summer recovery, I realized in retrospect that we didn't add anything to the line to dampen any energy should we have suffered a break. I consider that a lapse on my part. Having a dedicated item in the kit will go a long way towards ensuring that this measure is not overlooked in the future.

So, that's about it for this edition. Check out our club, "Frontier Off Road Club East (F.O.R.C.E.) on Facebook for more information on upcoming trail rides.

-will