When it was all said and done, it turned out to be a LOT of red. My radiator skid is off in this shot, but I had also previously painted that red. I'll probably remount the snow plow markers directly into the fender wells as I no longer have a suitable bumper location
I think I might have seen too many episodes of Orange County Choppers and other such shows where they weld on items of flare to fit a theme. I had these 'teeth' and now all of a sudden my truck is the Landshark Edition. If nothing else, it was a fun little diversion to add these on.
Alright, to the beginning of what was done here.
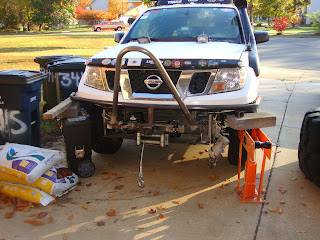
I stripped off the last vestiges of the stock bumper assembly. The cross bar and brackets had long since given way to the winch mount. But now the bumper shroud and improvised bracketry have been removed as well. The only thing I retained were the two vertical sections of unistrut that I welded to the winch channel. I am anticipating mounting my fog lights to the unistrut and leaving the light housings safely tucked behind the tubing of the pre-runner bumper.
I ordered the stinger bar from Rusty's Offroad Products;
http://www.rustysoffroad.com/. It arrived promptly and was exactly the dimensions I had been seeking. I have a pipe bender, but not a tubing bender which is capable of producing such bends without kinking the tube.

With the amount of time I would be investing into this bumper evident, I didn't want to risk having my current winch completely malfunction requiring replacement...and time-consuming dis-assembly of the bumper. The T-max winch still works, but something has caused the clutch to no longer release preventing me from free-spooling the cable. I've done numerous successful recoveries (following unsuccessful obstacle attempts) in this condition and I still regard it as dependable. It is far less likely for me to need to be recovered from the rear (although this has happened twice). All that is to say that I opted to move the current winch to the rear and ordered this model by Superwinch. It is rated for an additional 1,000 lbs of line pull and was a comparable price to what I had paid for the T-max. I will be looking to put this to the test once I get back on the trails.

I decided to salvage the front receiver hitch, this time inverting it and mounting it up above the winch channel tray. I did some test mounts clamping it in place with the vise clamps. The Stinger can then be welded to what was previously the underside of the receiver. I had to cut off portions of the prior recovery points on the receiver. And this got me to thinking about ordering up some new recovery points for D-ring shackles to be mounted onto.
 |
| Doing a couple of test fits to figure out my desired angles. |
I opted to have the stinger project outwards at about a 60 degree angle.
 |
| I ordered the shackle mounts from GenRight Offroad. Here they are already in place welded to the cross bar. |
In mocking this all up, I saw that the desired angle was going to put the stinger a few inches out in front of the 'bumper' cross bar. I figured I could weld up a couple sections of tubing to span the gap between the two to join both members at the plane where they would intersect.
This particular build day was going to be cut short for some impromptu dinner plans with friends of the wife. I decided to shelve my plans for the front bumper and try to do a quick job of relocating the winch in the remaining time I had to myself that day.
Originally, I was going to reuse the winch tray that I bought to fit in either the front or rear receiver and fashion that to fit on top of the rear receiver hitch in some way. However, the 2" tube steel and the thickness of the plate itself was going to have the winch riding too high to fit in the space between the top of the rear receiver and the underside of the truck bed. I quickly went out to Harbor Freight to pick up another Badlands winch channel. I performed three welds of about 6" on each side of the receiver and then top welds on either end.

Then I threw that bad boy back up underneath the truck. The wiring wasn't done until the next day. I went to West Marine to pick up some additional marine-grade wire and accessories to make a high current junction/splice as the cables could not reach from the control box to the power hub I have in the rear toolbox. The Superwinch that I installed in the front actually came pre-wired so I had to use it's wiring to run up to the battery and remove the T-max wiring for use in this location. I already had a high current "On-Off" switch which I had planned to use under the hood for the front winch. I decided I would mount this in the rear toolbox to keep power to the rear winch off to avoid any unintended short-circuiting. Eventually I will do one in the front, but this new rear setup is a bit more susceptible.

I had thought about getting rid of this drywall cart, but it actually makes for a rather handy work surface and was good for rotating the work piece around to access the various points I needed to weld and later grind my welds.
A little self-timer action so that you know it is me behind the madness.
I was able to get the cross bar bent to reasonably approximate the curvature of the front end. Ultimately I did a center bend and two intermediate bends midway between the center line and the edge of the bumper. The return bends were actually intended to be discarded all along. They were left over from when i was going to make my rock rails into full on rock sliders to include the step hoop. I realized my welding at the time was not quite up to par and I was not interested in the additional weight. The rails alone seemed pretty elegant without the extra metal. But since I reuse almost everything, it seemed a good opportunity to salvage the bent pipe and repurpose it for the front end instead.
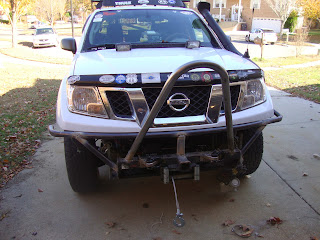
I took a square section to give a bit of front support to the cross bar of the bumper. I also liked that it closed up an opening where the radiator was otherwise vulnerable. I'm back and forth on whether I want to put a stainless steel 'skid' in the stinger with some holes drilled in it for airflow. I don't want to block the logo. I think for now, I will leave it open. I salvaged two nearly door sized pieces of stainless from a demo project where they were armor cladding for a wood door. I think I like the open look more.
 |
| Primer on the bumper after cutting off the return ends and grinding the welds. I begrudgingly ground my welds and realized it does make a difference in cleaning up the appearance when the effort is made. |
I started messing around with this concept for the rear bumper. I was bored with using just this remnant of 2" square tubing to make a cross-brace in the rear. I actually re-used the brackets left from the bull bar to cap the ends of this bumper piece. I cut the tube steel down to fit within the void between the rear fender portions. The longer leg of the brackets now make a bit of a foot-hold to aid stepping up and into the bed of the truck.
I have shark's teeth. These are left over triangular scrap Bill gave me 2-3 years ago when I first got my welder for home. I've watched too many of those custom chopper shows.
The end.
Back to Archive


No comments:
Post a Comment
Hey! Let me know what you thought of the post or how you came to stumble on this little corner of what we call, "the interwebs". Thanks for stopping by and leaving a comment.
-will