


The Dual Battery install for me was done in no fewer than 3
distinct phases. It was originally not even my intent to create such a setup; I
was initially just trying to upgrade the stock battery in exchange for one
which could capably handle the load of the winch. So think of this as less of a
‘how-to’ manual and more of a discourse of what to expect/anticipate and
proactive measures that can be taken to avoid some of the pitfalls I
encountered. Ultimately I’m satisfied with the setup. I need to complete final
wiring of the winch itself (funny how that has been neglected when that was the
initial impetus). I think I’ll have the opportunity to use it on this trip, but
hopefully it is to pull someone else out of a jam and not me. It is presently mounted and the wires are
roughed in. My departure date and some of the other preparations quite
literally came down to the wire. I’m writing this after having logged nearly
1,000 miles on the road today after a little over of 3 hours of sleep the night
prior (again, wrapping up things). I took frequent breaks to compensate and at
no time drove a stretch exceeding 3-4 hours consecutively. The additional
mileage beyond my projections means that I get to sleep in and will be
continuing on with nearly a full 8 hours respite. I digress. Here’s how the
dual battery went down.
This first progress photo is all of the parts I anticipated needing and
procured.

The bulk of it was obtained from West Marine, a boating enthusiast
supply merchant and there happens to be a location not far from me. I was first
turned on to the Westin Automotive system which is marketed specifically for
automotive applications. However, at the time I finally set out to do it, the
product had suddenly become unavailable through most venues, and those that did
still offer the item, did so at rates that seemed to be marked up on a daily
basis. Some supply chain anomaly was in play. I also had concerns over the
gauge of wiring utilized in the packaging. Although it meant a significant cost
premium to use the Blue Sea System setup (which does not include any wiring),
the ability to select the gauge of wiring based on the anticipated amperage
draws was a major selling point.
My setup design changed. Initially I had intended to mount
the controls (switch and relay) under the hood and have the backup (or ‘house’
per the manufacturer diagram) staged remotely in the toolbox. This proved
problematic as the most viable locations for me were also the least accessible.
And I wanted the install to be serviceable in the event a fuse was blown or
additional loads needed to be added.
So although I had only purchased enough wiring for the
initial concept, with relatively modest modifications, I was able to relocate
all of the switching and relay components to the rear tool box and only use one
conduit run beneath the chassis. For the bends, I used Liquid-Tite flexible
conduit. To cut down on weight, I used EMT in lieu of rigid conduit which is
considerably heavier than the former. My reasoning was that the nerf bar and
body afford some modest protection of the EMT tubing. And if I’m striking
obstacles that high (and now with a 2” lift) I’ve got more expensive problems
on my hand than shorting out the backup battery (which is fused; my thought is
that the fuse would blow prior to anything igniting).
The diagram provided with whatever system used will prove to
be relatively straightforward. I’ll skip the minutia of the individual
connections. Here are the problems I encountered, which are more illustrative.
And perhaps you will devise better means of mitigating.
1: The pole positions of the stock battery and the Yellow
Top are reversed.
What I ended up doing to extend the leads was not pretty.
The ground extender wasn’t so bad. For the hot lead, I had a lot of trouble
with doing anything to the harness. I couldn’t separate the holding
nut&bolt. They appeared to have been bonded with JB Weld or Locktite. Which
was great from the standpoint of resisting vibration, but bad for my purposes.
Also, the difference in the height of batteries (the 34 D I used is about 2”
shorter) meant that the harness would not rest on top of the battery even if
the pole positions hadn’t been switched. Perhaps select a Yellow Top with the
same arrangement if available.

2: Pay attention to the components of the secondary battery
harness. The top ‘bar’ was no bar at all for the first one I picked up.
I just had to go get another. Loss of like 5 bucks, a little
time, and gas money.

3: This wasn’t a problem, but maybe a good detail. Consider
how you want to mount the components if you are going with an exterior tool box
arrangement.
I didn’t want screws
poking out of the bottom of my toolbox and I also thought some sort of
insulating/non-conductor ought to be the base of the equipment going in there.
Some spare 2x10 was sacrificed. I pre-drilled the holes from within the box
down through the bottom. Then to secure the wood base, I screwed the screws
from beneath up into the wood. So all that is exposed is the screw heads. But I
anticipated needing to unscrew and rescrew the switch into place several times
to add or remove items, and I didn’t want the location holes in the wood to be
stripped over time. So I tack welded some weld nuts onto the back of an
electrical cover plate and created this pedestal to be mounted to the wood with
an offset. The offset allows the excess length of the screws which mount the
switch to the plate to pass through and not immediately make contact with the
wood. At least one good thing I thought of.

4: Consider ‘future’ provisions.
In construction, even if only one pantry is being built, we
often have direction to stub out an additional tap or two in case there are
other utility needs in a space or if the space gets reconfigured at a later
juncture. So why I neglected this on my own project is beyond me. Probably
because the conductors fully occupied the conduit and I could barely pull them
through. (Helpful tip from the Home Depot electrical pro; save your money on
buying the expensive pulling liquid and just use liquid soap to lubricate the
feeder wire. Your run is going to be comparably short compared to what an
electrician contends with. So when I revisited my work to install a roof cargo
basket, I had to drill a second, 1” hole (which I didn’t want to do) to provide
another point of entry for the conductors. But this time I got smart and used a
T-shaped junction box with the outlet capped for now. If I want to power
something else, I just will uncap the unused outlet and use the same path to
enter into the toolbox from the side without needing to drill a third hole.

5: An inverter might be a good thing to add to your setup
and design for its inclusion from the beginning.
For me, it was, surprise, an afterthought. When I first
‘finished’ it, I didn’t have any loads connected to either contact point on the
switch. I wanted the direct connection of the alternator to the start battery
to not be compromised. That was important to me for winching operations. I
anticipate that 90% of the time, I’ll either want to pull myself up and over
something (or through something) and the balance of the time, I may just have
to chicken out, tuck my tail between my legs and drag myself out of the mess I
had gotten myself into. But the point is that most of the winching will be done
from the front and that’s where the alternator is. When I got around to
building my own cargo basket, naturally I wanted to put lights on it. And those
lights need power. Great. I can actually use the switch to control a load and
not just as a means of combining the batteries in an emergency. That function
is KEY, but I hope not to frequently be doing that. Controlling the house loads
via the switch is good. My dilemma, though, was that I didn’t want to contend
with trying to hardwire everything into the switch for items I might only occasionally
use. And then there are things like tools and perhaps TVs, etc that I’d want to
use for camping or tailgating. Enter: the inverter. So if you are doing a dual
battery, you probably ought to consider having that hooked up to your switch so
you can have plug-in loads and hopefully reduce your dependency on hard-wiring
loads to the switch.
6: The light box (see the very first pic of the overall setup)
It was a great idea and the top mounting plate looks very
professional, in my humble opinion of my handiwork. Problem was that I did not
initially count on the depth needed to accommodate the switches and the thick
#4 gauge pigtail wire I used to connect the hots from the lights to the switch.
The #4 is the big space hog in the box. And it didn’t help that I used switches
with slide-on connectors that enter from the back/bottom of the switches as
opposed to the side. I had already painstaking made all the connections and
didn’t want to undo them and have some go on not as tightly/securely as before.
So I had the brilliant idea of trying to weld on the spacer box that I made
with everything connected. Do not do this. I nearly burned up all of my work! A
few of the tacks held in lieu of a full weld. If I find a reason to modify it,
I’ll go back, disconnect everything, fully weld the boxes and reinstall. I just
really thought I could stuff everything in there like you sometimes have to do
with real light switches, but the connections were a bit too temperamental and
I didn’t feel confident in handling them that roughly. At least with a
receptacle, you’ve got good mechanical attachment via the set screws. All of
these were essentially friction fittings.
7: Wiring pathways
I did a reasonably good job of routing the wires within the
toolbox. I could have done better. Replacing the battery in my setup will not be
the easiest. I’ve had to take the battery in and out maybe 6-7 times either
because it was being replaced (I used the stock battery for a while) or because
something fell behind it. Every time it was a chore because you have to lift
straight up, and then tilt to clear the edge of the box and the lid and the
wiring. And the wiring invariably either gets hung up on the battery or blocks
it from seating. You may have more success with cable management. I do think
they are at least bundled well and sit in place neatly. And hopefully the
action of swapping it out isn’t done with any greater frequency than once every
3-5 years. Maybe longer since it is only a support battery and doesn’t have the
same demands as the primary starting battery.
How do I know it works?
I used a multi-meter to check the initial charge on the
house battery. I connected some loads to it and let it get drained down while I
worked on other things. I checked again and the voltage had dropped. I started
the engine and let it run. The voltage was back up.
What about back-up recovery?
Well, I didn’t want to unnecessarily drain down my first
yellow top which was doing the primary starting at this point. (My experiment
was back when I had the stock battery as the house. I didn’t care much about
that leaky thing). So what I did…and
this was a terrible idea I think for my electrical system, was to remove the
positive cable lead from the starting battery. I thought there’s no better
simulation of a depleted battery than to have no battery whatsoever in play. I
flipped the switch to combine. The little LED initially did not illuminate to
confirm they were linked. I was convinced I had miswired something. Anyway, I
went ahead and tried to crank the engine, not expecting much, and surprising it
turned over and was ‘running’. But this is why I say, don’t ever do this. My
gauges were quivering. All of them. I
revved the engine and the tachometer just quivered, albeit more feverishly when
revved. I think the issue was that the alternator was not able to kick in to
take over the electrical lifting of actually running the truck, and so the
second battery was trying to do all of that alone. I’m clearly not an
electrical expert, but I feel pretty confident about sharing what I found to
NOT have been a great idea. So assuming your primary battery is just drained,
and not missing, using the Combine feature will furnish the needed reserve
power to provide ignition and all of your needed electrical connections will be
in place.
Here are just some general progress photos that may help clarify how certain connections/transitions worked out for me:
 |
| Roughing in feed to the box |
 |
| Basic assembly of transition from Liquid-Tite to EMT |
 |
| Pulling conductors through conduit run |
 |
| This was phase 2. While I was waiting for the lift package attempt to get started, I had the notion to start making a light rack. I wedged the light control box I fabbed up in between the switch and the relay. |
 |
| Underside of chassis looking up at the flexible Liquid-Tite transitioning to the EMT |
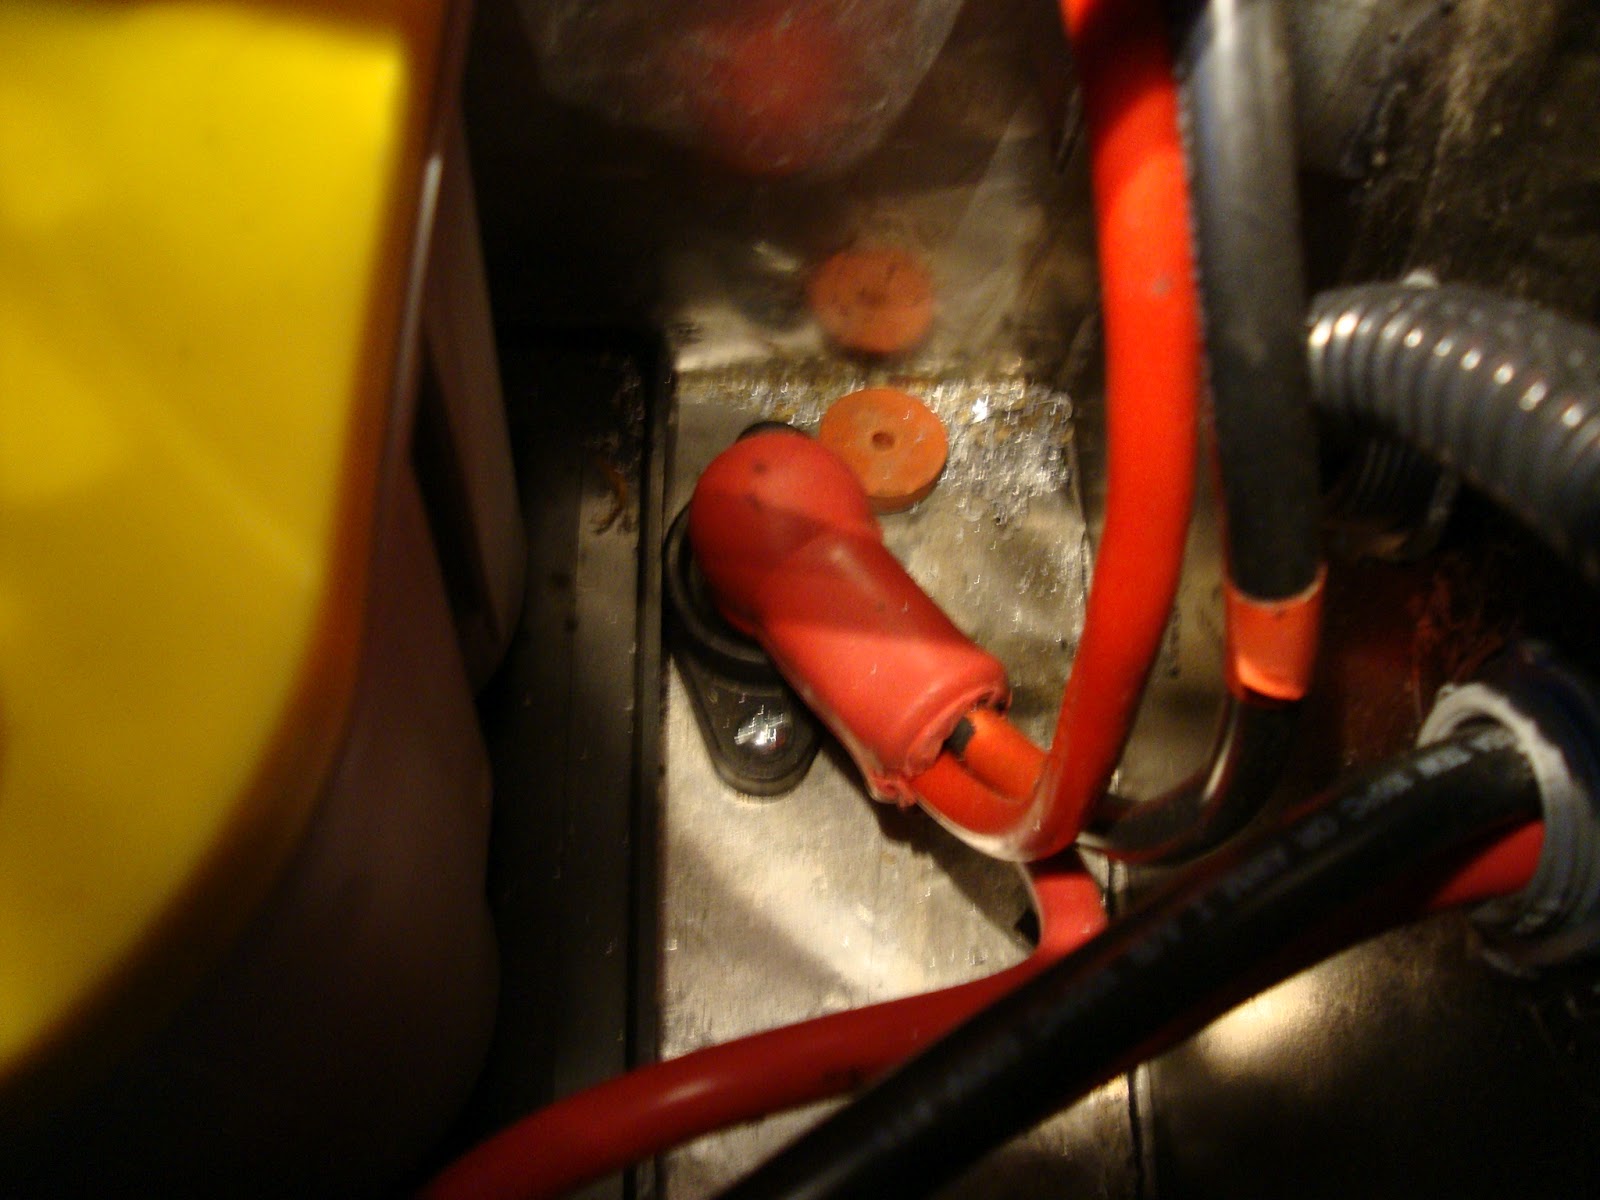 |
| This is an important little junction. I have the one feed from the positive post of the starting battery run to this terminal post. From there, I split off two leads; one goes to the relay and one to the switch. It saved on having to provide a second 20' run of conductor. I felt this was ok as the relay is only ever 'sensing' charge on a battery, not really being the source of a heavy draw. So they share the long path and branch off of this node/junction. |
Update 7/21/12
Just wanted to confirm that we ran a heavy duty hammer drill off of the inverter setup connected to this bad boy at work this past week. The mason's had already demobilized and didn't have their generator on site. I needed them to install some reinforcement on our revised mockup wall. Wheeled the truck over to the mockup, popped the toolbox lid, plugged the hammer drill in and let her rip. This might be one of my favorite features of the truck right now. I get regular use out of it.
Just wanted to confirm that we ran a heavy duty hammer drill off of the inverter setup connected to this bad boy at work this past week. The mason's had already demobilized and didn't have their generator on site. I needed them to install some reinforcement on our revised mockup wall. Wheeled the truck over to the mockup, popped the toolbox lid, plugged the hammer drill in and let her rip. This might be one of my favorite features of the truck right now. I get regular use out of it.
No comments:
Post a Comment
Hey! Let me know what you thought of the post or how you came to stumble on this little corner of what we call, "the interwebs". Thanks for stopping by and leaving a comment.
-will