7/8/12
I've made mention of this carrier in several posts, but I've yet to actually do the writeup for it. It's probably because I was trying to do like 4 different builds concurrently on the same vehicle and also plan out an itinerary and switch positions in the company. Typing that just now made me tired thinking of it.
Anyway, it is too late in the evening now to add the narrative to what I did, but at least this page serves as a bookmark for me to finally come back and commit to ink...or pixels/text as it were what went into building the thing. The best testament of it is that it survived the trip to and the abuse through the deserts of Utah. It also received some compliments from the guys over at Arlington Motorcar Service as being a seemingly stout design.
I'll come back to this page later in the week hopefully.
7/21/12
I still haven't posted the pictures; I got caught up doing other things this Sunday and my blogging/posting time is nearly done. I did want to comment that this little basket does a great job of hauling ladders. I thought it would be a liability up on top of the cargo racks, but I safely transported a 24' extension ladder from home to a jobsite 45+ miles away at highway speeds. My wife did present me with a challenge while we were out to brunch; she wanted to swing by one of the nearby shopping malls. The only stores I go to (Grocery, Home Depot and Target) for the most part all have surface lots. So we go to this garage and I'm nervous as all hell as I look at all of the low hanging, post-tensioned concrete beams threatening to clip off the top of my rig. Fortunately we were able to get in there. This truck is no longer a mall crawler, unless said mall has a surface parking lot. I guess that kind of defeats the original intent of me getting a mid-size truck to be able to work in downtown office buildings when I go ahead and do stuff like add a 2" suspension lift, cargo rack, and rooftop cargo basket...oh and maybe another 2" body lift. Ha!
10/14/13
Well, this is embarrassing. Thanks to reader Nathan for calling my attention to the lack of completion here. I got a note that confirmed that people do read this little blog asking for details on how the rack and basket were attached. I remembered starting this page and thought for certain I only had the one incomplete page (i.e. Finishing up the Old Man Emu kit page). Well there were at least two.
I believe I've got all the pics lined up from before:
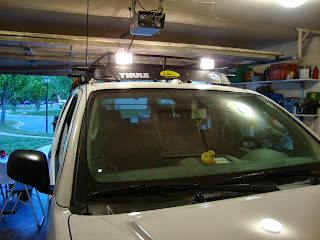
Alright, so the above was the teaser photo of the 'completed' assembly.
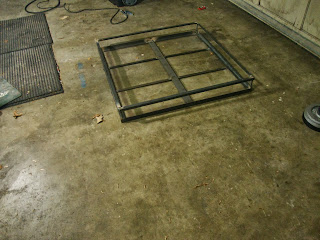
I work in construction and I also watch a few of those custom chopper programs. I like when the guys try to incorporate some aspect of the design to reflect the hobbies or interests of their clients. Since I am my own client, I thought maybe some bits of rebar might make for a cool touch to comprise the upright portions of the basket that separate the bottom frame from the top frame. My plan was essentially to weld together an upper and lower box sized to be roughly 3'x3' to be able to accommodate up to a 35" tire if I were ever so bold as to go to such a beefy setup. In hindsight, I wish I had thought to make a longer basket to be able to accommodate a few more items. I think, at the time, I was apprehensive about exceeding the recommended load rating (150 lbs) and I had yet to be able to demonstrate how sturdy of a setup I might be able to achieve in this regard. I've had this thing in Moab, and on about a handful of other off road excursions; it isn't going anywhere. There were a few times that I took it down because I don't like the thought entering my head of having a higher center of gravity when the trails go a bit off-camber (HATE OFF CAMBER), but every time I try some bed mounted option for carrying my spares and such, I just get frustrated with the cluttered access to my toolbox. I digress.
I wasn't confident in my welding abilities at the time to attempt to fabricate this out of thin-walled tubing. I also don't have the setup to do aluminum welding. So my initial effort used angle iron. I believe it was 1-1/4" L iron and then a stock piece of 2" wide flat bar. It was a bit flimsy at the lower section where the tire would go.
This is initially what I did in the rear. The standard piece of metal that came with the U-bolts held on this trip. Over time though, over-tightening caused the ends to bow down. I replaced this metal piece with a welded section of Unistrut welded directly to the side of the basket. No more deflection in the rear. Just needed to add larger washers to prevent the nut from slipping through the oval openings in the unistrut. A 6" or so section should suffice.
This shot shows the added rails while I was setting it up for painting.
Test fitting the tire. I drilled two holes through the center 'spine' of the rack and fed two, 1/2" bolts in 8" lenghts (I think). Basically I have the bolts bolted to the frame first to hold them in place on the rack. Then I place the tire over the studs that are created by the upper portion of the bolts beyond the nut. Then I fasten the tire to the studs with Grade 8 washers and an additional nut on each stud. Holds it firmly in place.
At the time, I was really keen on running lights through the cargo basket. And for the Moab trip, I did just that. But then I got home and didn't need to have the basket mounted all the time. But I still wanted the lights. I went through several iterations of mounting the lights to the rack and finally culminated in two being mounted to the rear of the headache rack and two being mounted to the hood on an ill-advised Hi Lift Jack mount. No one advised me to do this. I saw a Jeep with a hood mount and instantly wanted one. Well Jeeps have a beefy hood bracket; whereas, I thought I might be able to beef up the two layers of sheet metal that comprise my hood through some throughbolting and other means. No. I advise against this. It holds in place, but it bounces on the trail. Lesson learned.
Unfortunately I don't have a close-up of the front attachment. In the excerpt below, I have the text from my email to Nathan that kind of describes the Rhino Rack and how I fit it to the truck, and the cargo basket to it.
(Editor's Note- Front and rear air locking was achieved in 2014 and further enhanced in 2015 with the move to the Titan M205 with locker up front. Previously we locked the R180).Although they don't market it specifically for the Crew Cab, I took a chance and ordered the Rhino Rack aero bars from AutoAnything that they advertised as fitting the King Cab. I reasoned that the contours between the King and Crew couldn't vary THAT drastically that it would only fit one model and not the other. I was correct.I'll have to check my records though; I do not recall the rack system being quite this pricey when I obtained mine. I feel like it was only 140 or 180. Need to check.As you can see, the 'foot' creates a friction/compression fit with a custom rubber boot that fits in the rain channel on the top and a metal angled bracket with some teflon-like padding that sandwiches the lower surface of the upper door frames. One bolt for each side of each bar tightens them down. I've had this thing in Moab with a tire loaded and it has not budged. You might be able to find a similar system at a lower price point. This is actually pretty pricey for what they are...just some aluminum cross rails with rubber feet.As for the attachment of the rack, I didn't want to dish out major bucks for the Rhino Rack basket (which looks sweet, but costs $400); so, I welded up my own. In retrospect, I wish I had sized it to be large enough to accommodate a tire PLUS maybe a few other lightweight, bulky accessories, but oh well. I'm thinking of making either a longer one or adding a extension component to this current one.I used U-bolts to attach the basket to the rack. In the rear, I believe they are either 3-1/2" or 4" U bolts mounted vertically fed up through a bracket welded to the side of the basket.In the front, I have two more U-bolts in this orientation |=) if that makes sense. They are horizontal. I have a single nut welded to the side of the basket and one stem of the u-bolt is fed through the opening of the nut and then the bracket that came with the Ubolt compresses against the front of the rail. I chose this orientation so that the bottom of the U is forced against the back of the bracket such that in a panic stop, the strongest part of the U-bolt is forced forward against the rack.I thought I might have done a post that showed the brackets up close, but I can't recall. I'll check. If there aren't any photos and some would be helpful, I can send to you.I really really really wanted the factory rack, but at the time, I knew nothing about offroading, and the premium to go to the Luxury package did not, at the time, seem worth the upcharge if I didn't plan on wheeling the thing just to have a rack.Ultimately, I'm happy with the SV. I have the option still to go front AND rear air locker and I can remove my makeshift rack when I have to go into downtown DC parking garages and such. But when I roll with Xterras, I do sometimes regret that I don't have the rooftop similarity. Oh well.Hope that helps.
Back to Archive


No comments:
Post a Comment
Hey! Let me know what you thought of the post or how you came to stumble on this little corner of what we call, "the interwebs". Thanks for stopping by and leaving a comment.
-will